
Smooth Operator: How to Use Filler Like a Pro
Why Substandard Surface Preparation and Filler Application Should Not Be Ignored
When repairing automotive panels, rushing the initial stages is a recipe for long-term failure. The bond between your vehicle's metal panel and the body filler relies entirely on mechanical adhesion. If the surface is not prepared correctly, the filler cannot grip the substrate. Over time, vibration, road shock, and temperature fluctuations will cause the filler to pull away from the metal, leading to cracking and eventual delamination.
Another major risk of poor preparation is moisture entrapment. Polyester body fillers are naturally porous. If you apply filler over trace amounts of surface moisture, or if water penetrates the filler from an unsealed reverse side of a panel, that moisture becomes trapped beneath the paint film. In the harsh Australian climate, hot summer days cause this trapped moisture to expand, leading to unsightly paint bubbling and blistering.
More seriously, trapped moisture in contact with bare steel inevitably leads to corrosion. What started as a cosmetic dent can quickly turn into a structural rust issue that eats through the metal from the inside out. Understanding the fundamentals of rust prevention and treatment is critical before you even think about reaching for a spreader. For a deeper look into protecting your steel panels before refinishing, our beginner's guide to rust repair and prevention offers essential advice on stopping corrosion in its tracks.
Common Challenges and How to Use Filler Correctly
Achieving a flawless, invisible repair requires a systematic approach. The most common challenges in the workshop stem from skipping basic preparation steps, incorrect mixing, or ignoring environmental conditions.
Surface Preparation, Cleaning, and Degreasing
Before any sanding or filling begins, the panel must be thoroughly cleaned. Applying sandpaper directly to a dirty panel will only ground grease, road grime, and wax deep into the metal's pores, severely compromising adhesion.
- Begin by washing the area with soapy water to remove water-soluble contaminants.
- Dry the panel completely, then use a professional wax and grease remover (pre-solvent) to strip away oil, silicone, and tar.
- Always use a clean, lint-free cloth to apply the solvent, and a second dry cloth to wipe it off before it evaporates.
Mixing Techniques and Environmental Constraints
Mixing body filler is a precise chemical process. Polyester filler relies on a benzoyl peroxide hardener (catalyst) to initiate curing.
- The Golden Rule of Mixing: Never stir filler in a circular motion in the tin, as this introduces air bubbles that translate into pinholes in your cured repair. Instead, scoop the required amount onto a clean, non-porous mixing board.
- The Kneading Step: Before squeezing hardener from its tube, knead the tube thoroughly with your fingers to ensure the liquid and paste components are fully blended.
- The Folding Technique: Apply a small ribbon of hardener to your filler scoop. Using a plastic or metal spreader, use a firm "folding and wiping" motion to press the hardener into the resin. Wipe the mixture flat across your board, scoop it up, and fold it over itself. Repeat this until the mixture is a completely uniform colour with no streaks.
Environmental conditions play a massive role in how your filler behaves. Extremely cold temperatures can slow down or completely halt the chemical curing process, while high heat will drastically shorten your working time (pot life), causing the filler to gel and clump before you can apply it smoothly.
Application and drying times vary from product to product, so always check the manufacturer's technical data sheet or product label for the exact specifications before you start.
Pro Tip (AI-Enhanced Best Practice): To achieve the perfect 2% hardener-to-filler ratio without guessing, aim for a ribbon of hardener that runs from edge to edge across a golf-ball-sized puddle of filler. In extreme Australian summer heat, reduce the hardener slightly to extend your working time, but never drop below 1%, as under-catalysed filler will remain tacky and fail to cure fully.
Understanding What is Body Filler for Cars and Selecting the Right Product
Choosing the right type of filler is essential because different repair scenarios require different material properties. We stock a comprehensive range of professional body fillers designed to handle everything from deep structural voids to ultra-fine surface pinholes.
Glass Fibre Reinforced Fillers
For deep dents, areas structural in nature, or panels that have undergone welded repairs, a glass fibre reinforced filler is the correct choice. Products like u-pol fibral glass fibre filler contain short strands of fibreglass suspended in polyester resin. This formulation provides immense structural strength, water resistance, and bridges larger gaps without sagging or cracking. It is designed to build the initial foundation of a deep repair rather than act as a final finishing layer.
Lightweight Polyester Fillers
For standard dent repairs, shaping body lines, and general cosmetic work, lightweight polyester fillers are the industry standard. Premium options like Evercoat Rage Gold Filler or U-pol Fantastic Body Filler offer exceptionally smooth application, minimal pinholing, and effortless sanding characteristics. For general trade use, Roberlo Maxifill Bodyfiller 3L and Concept Bodyfiller Lightweight provide highly reliable, stable bases for everyday panel beating.
Finishing Glazes and Polyester Primers
To fill tiny pinholes, sand scratches, and minor surface low spots, a dedicated finishing glaze or sprayable polyester filler is used. Products like U-pol Dolphin Glaze Putty or Evercoat Ever Glaze Spot Putty are highly fluid, allowing them to flow into microscopic imperfections. For larger areas requiring a perfectly flat profile, a sprayable polyester filler like U-pol Reface Polyester Filler can be applied via a spray gun to act as a high-build, ultra-flat sanding base.
To understand more about the role filler plays in the restoration process, check out our guide on what is body filler for cars. If you are unsure which specific formulation suits your repair, read our in depth guide compare car body fillers to match the right product to your substrate.
Step-by-Step Guide on How to Use Filler for Minor Dents and Imperfections
Once your panel is clean and degreased, you can begin the application process. Following a structured technique ensures a strong bond and minimises the amount of sanding required later.
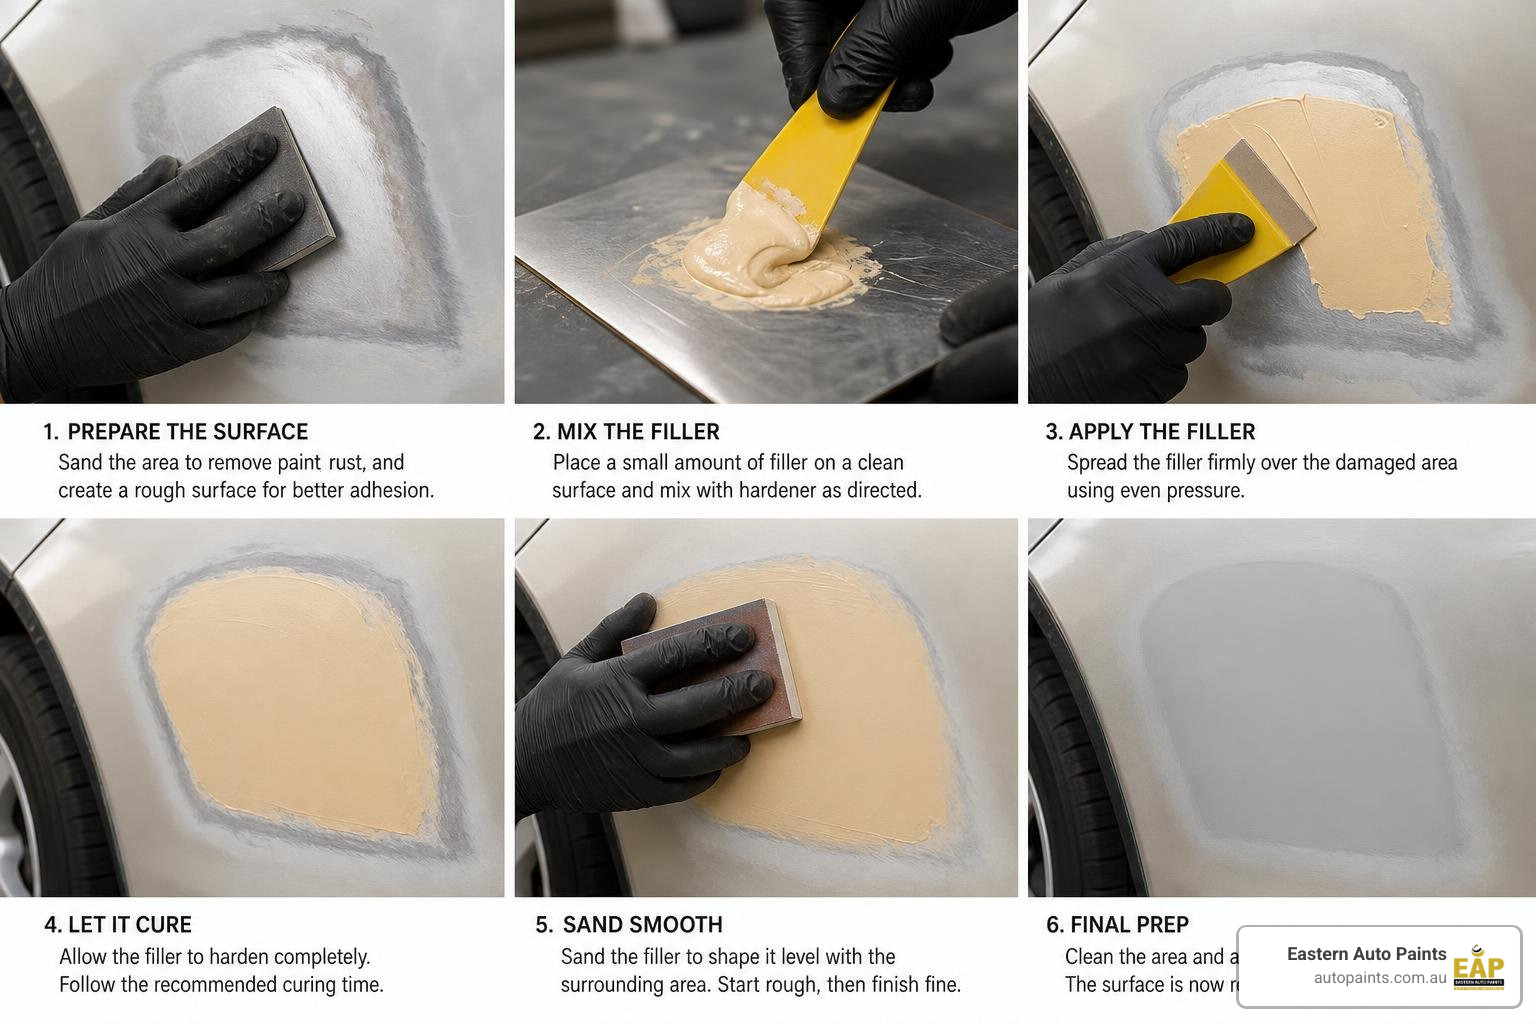
1. Surface Keying
Filler will not adhere to smooth, shiny paint or primer. You must grind or sand the repair area down to bare metal, extending roughly 50mm (2 in) beyond the edges of the dent. Use a coarse grit sandpaper on a sanding block or a dual-action (DA) sander to create a deep mechanical scratch pattern (key) in the metal.
2. The "Tight Coat" Technique
When applying your mixed filler, your first pass with the applicator must be a "tight coat." Using a plastic applicator from a body filler plastic applicators 10-pack or a flexible metal spreader from a body worx filler applicators metal 4pcs set, press the filler firmly into the bare metal scratches at a steep 60-degree angle. This forces the filler into the microscopic valleys of the scratch pattern, eliminating air pockets and ensuring maximum mechanical adhesion.
3. Building the Profile
Immediately after the tight coat, apply subsequent layers to build up the dent's profile. Hold your applicator at a shallower 30-degree angle to lay down a smooth, even layer. Always aim to apply the filler in thin coats, building up the repair gradually rather than slapping on one thick layer. Overfill the dent very slightly (by about 10%) to allow enough material for sanding flush, but avoid excessive overfilling, which simply wastes material and increases your sanding time.
For a comprehensive walkthrough on mastering your spreading technique, read our article on how to bodyfiller like a pro or explore our guide on filling holes in car body.
Advanced Techniques on How to Use Filler for Deep Voids and Welded Seams
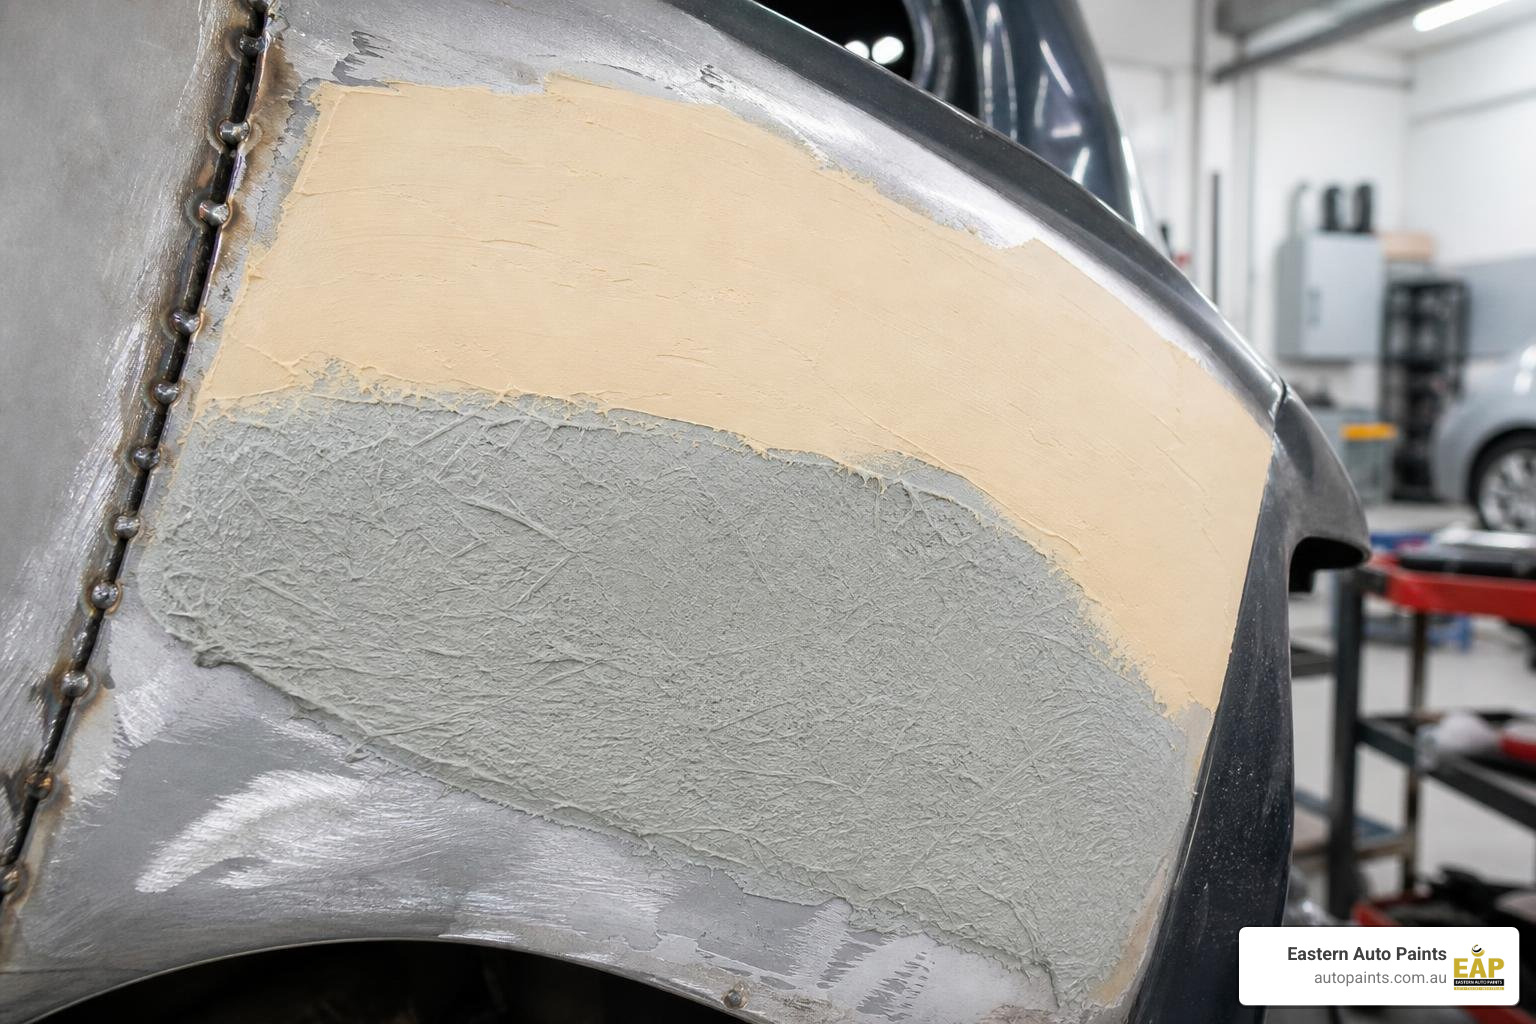
Deep voids, rust repair patches, and welded seams present unique challenges. Because standard polyester body fillers can shrink slightly as they cure, filling a deep void in a single, thick application will lead to the centre of the repair collapsing, cracking, or trapping solvent.
Multi-Layered Application
When dealing with deep voids, always use a multi-layered approach. Begin by applying a high-strength, structural foundation layer of u-pol fibral glass fibre filler. This bridges the gap and provides a rigid, non-shrinking base. Once this initial structural layer has cured and been sanded back to shape, apply your lightweight polyester finishing filler in thin, consecutive layers to achieve the final contour.
Checking for Pinholes in Welded Seams
Welded seams must be thoroughly cleaned of all welding slag, soot, and oxidation before filling. Before applying any filler over a welded repair, check the seam for microscopic pinholes. A simple trade trick is to darken the workspace and hold a high-intensity work light behind the panel. Any points of light leaking through indicate a pinhole that must be addressed.
Seam Sealing the Reverse Side
Because polyester filler is porous and acts like a sponge, it must be completely sealed from moisture on both sides of the panel. Once your welded repair is complete, you must apply a high-quality automotive seam sealer to the reverse (back) side of the weld. This prevents moisture, road spray, and condensation from penetrating the back of the weld and soaking into your filler, which would eventually cause the filler to lift and the paint to blister.
Sanding and Smoothing for a Seamless Finish
Sanding is where the shape of your panel is truly restored. The goal is to make the transition between the filled area and the surrounding metal completely seamless to the touch and eye.
Dry Sanding Techniques
Always dry sand your body filler during the shaping stages. Because polyester filler is highly porous, wet sanding at this stage will introduce water into the filler. This trapped moisture will eventually lead to paint blisters or surface rust forming beneath your primer. Only use wet sanding during the final primer finishing stages, well after the body filler has been sealed.
Sanding Block Progression
Never hand sand body filler with loose sheets of sandpaper wrapped around your fingers; your hand will naturally follow the contours of the dent, resulting in an uneven, wavy finish. Always wrap your sandpaper around a dedicated sanding block, such as a velocity sanding block with clips or amaxi sanding blocks.
When sanding, work in a cross-hatch (X) pattern at a 45-degree angle to the repair. This ensures you cut down the high spots evenly without digging troughs into the filler. Progress through sandpaper grits systematically:
- Initial Shaping: Use a coarse grit disc from our sanding sheets disc range to cut down high spots and quickly establish the panel's basic shape.
- Refining Contour: Transition to a medium grit sheet from our sanding sheets collection to remove coarse scratches and blend the filler edges.
- Featheredging: Finish with a fine grit paper to blend (featheredge) the transition between the filler, bare metal, and original paintwork.
To avoid common sanding pitfalls, read our detailed guide, don't get bogged down your complete guide to body filler sanding. For advice on selecting the right abrasive for each stage, check out our guide on what grit sandpaper for body filler.
Checking Flatness with Raking Light
To verify if your repair is perfectly flat, do not rely solely on your eyes under direct overhead workshop lighting. Turn off direct lights and hold a hand-held work light or phone torch at a very sharp, low angle (raking light) across the panel. This casts long shadows behind any remaining low spots or high spots, showing you exactly where you need to sand further or apply a touch more finishing glaze.
Priming and Painting Over Cured Filler
Once your filler is sanded flat and featheredged smoothly into the surrounding panel, it must be sealed with a professional primer before painting. Applying colour coats directly over raw body filler will result in "paint sinkage," where the porous filler absorbs the solvents from the paint, leaving a dull, sunken outline of the repair in your final clearcoat.
Primer Selection
Choosing the correct primer is critical to lock out moisture and provide a stable, uniform surface for your topcoat.
- Epoxy Primers: If you have large areas of exposed bare metal around your repair, applying a premium epoxy primer like Epotec Primer Surfacer is highly recommended. Epoxy primers offer outstanding corrosion resistance and chemical adhesion to bare steel and aluminium. Learn more about these high-durability coatings in the guide to epoxy primer paint for cars.
- Etch Primers: For smaller bare metal touch-ups, a self-etching primer containing phosphoric acid, such as Concept 103 Etch Primer or Protec PPG Grey Black Etch Primer, will chemically etch the metal surface for a secure bond. Read our guide on Self Etching Primer to see how these products protect your metalwork.
- High-Build Primer-Surfacers: To fill minor sanding scratches and provide an easily sandable surface, apply a high-build 2K primer-surfacer like Concept HS 2k High-build Primer 5L Kit or Unicolour HS Pro 2K 5L Primer Kit.
For a complete breakdown of primer categories, explore our guide on choosing your canvas understanding automotive paint primer types or consult our a practical guide to choosing auto paint primers to find the perfect system for your project.
What a Personalised Experience Actually Looks Like
At Eastern Auto Paints, we believe that choosing the right refinishing products shouldn't feel like a guessing game. Walk into our Bayswater head office or our Dandenong South trade showroom, and you won't find generic, one-size-fits-all answers. We take the time to understand the exact scope of your project, the substrate you are working with, and your workshop setup.
Our team provides expert technical guidance tailored to your specific needs. Whether you are a professional panel shop looking for a high-efficiency polyester filler that cuts down on sanding times, or a serious restorer working on a classic car tray in your home garage, we guide you to the exact product system that will deliver a flawless finish. We look at the entire repair process, ensuring your chosen body filler is chemically compatible with your primers, basecoats, and clearcoats.
The Value of Consistency and an Ongoing Relationship
For our trade and commercial customers across Melbourne, consistency is everything. A busy panel shop cannot afford variation in material performance, curing times, or sanding characteristics. By partnering with Eastern Auto Paints, you gain access to a reliable, dependable supply of premium refinishing materials that perform identically from job to job.
Beyond supplying premium body fillers and abrasives, we specialise in precision colour matching. We save custom formulations for our trade clients, ensuring that when a repeat commercial vehicle or fleet truck comes back into your shop, the colour match is identical to the first application. This level of consistency builds trust with your own clients, speeds up your throughput, and ensures your repairs are completed to a professional standard every single time.
What to Expect at Eastern Auto Paints
When you visit an Eastern Auto Paints location, you are stepping into a professional, trade-focused environment designed to support high-quality refinishing work. We stock an extensive inventory of premium, authentic brands including PPG, Jotun, Concept Paints, and Anest Iwata, ensuring you have immediate access to the best tools and coatings in the industry.
Our showrooms are staffed by industry specialists who understand the practical realities of panel preparation and paint application. We leverage advanced colour matching spectrophotometer technology to scan your vehicle's paintwork and mix a precise colour match in-store. Whether you need a custom aerosol can for a quick touch-up or a multi-litre 2K kit for a complete respray, we provide the authentic materials and technical support to help you get the finish right the first time.
When to Get in Touch or Take Action
Refinishing projects can quickly become complicated, especially when dealing with complex body lines, deep voids, or non-ferrous metals like aluminium. If you are staring at a challenging dent, dealing with a welded repair, or unsure how a specific product will react with your existing paintwork, the best time to get in touch for advice is before you start mixing.
Our team is always ready to help. Getting in touch early saves you from costly mistakes, wasted materials, and hours of unnecessary sanding. We can provide the official manufacturer technical data sheets (TDS) for any product in our range and talk you through the exact mixing ratios, curing considerations, and safety requirements to ensure your project proceeds smoothly.
Practical Solutions and Reassurance for Your Next Project
Taking on an auto body repair can feel daunting, but with a structured plan and professional-grade materials, you can achieve a seamless finish that stands the test of time. Start by breaking the job down into clear, manageable steps: clean thoroughly, grind back to bare metal, apply your filler in thin layers, and sand progressively.
Equipping yourself with the right tools is half the battle. Using high-quality Sanding Blocks and premium abrasives prevents waves and ensures a perfectly flat surface that is ready for primer. Take your time, follow the manufacturer's specifications, and remember that our expert team is only a phone call or a store visit away to guide you through every stage of your refinishing journey.
The Final Sand: From Filler Work to Flawless Finish
Achieving a professional-grade finish starts long before the paint gun is hooked up to the compressor. By mastering how to use filler correctly—from meticulous surface preparation and correct mixing techniques to progressive sanding and proper priming—you build a durable foundation that ensures your final paintwork looks flawless for years to come.
If you are planning your next automotive or industrial refinishing project, our team is here to support you with professional-grade materials and technical expertise.
- To ensure a seamless finish, explore our professional range of trade-grade Body Fillers to find the perfect system for your substrate.
- Browse our extensive collection of premium Sanding Sheets and blocks to ensure a perfectly flat, seamless repair.
- For personalised product advice or professional colour matching services, feel free to contact our team today.
Frequently Asked Questions About How to Use Filler
How do I choose between 1K and 2K fillers for my automotive project?
1K fillers are single-pack products that dry through solvent evaporation, making them suitable for very minor surface scratches and pinholes. 2K fillers use a chemical hardener or activator to cure, providing superior structural strength, minimal shrinkage, and excellent durability for deeper dents and major repairs.
Where can I find the exact mixing ratios and drying times for my body filler?
Mixing ratios, pot life, and drying times vary significantly from product to product depending on the manufacturer's formulation and ambient temperatures. Always consult the specific product's technical data sheet (TDS) or product label, or speak directly with our team to ensure you have the correct specifications before mixing.
What personal protective equipment (PPE) should I wear when sanding filler?
Sanding body filler generates fine dust that can be hazardous if inhaled. You should always consult the product's safety data sheet (SDS) and relevant SafeWork Australia guidelines to select the correct personal protective equipment (PPE), which typically includes a properly fitted particle respirator, safety glasses, and protective gloves.
How do I prevent my paint from sinking or mapping around the filled area?
Paint sinkage occurs when the primer or topcoat is absorbed into porous filler or when the surrounding paint edges are not feathered correctly. To prevent this, ensure the filler is fully cured, sand the edges with a fine-grit progression to feather them smoothly into the panel, and apply a high-quality primer-surfacer to seal the repair before colour application.
Can I use standard body filler over bare aluminium or rust-prone areas?
Standard polyester body fillers do not adhere well to bare aluminium and do not provide corrosion protection on steel. For aluminium substrates, you must use a specialised filler formulated for non-ferrous metals, and for rust-prone areas, it is highly recommended to apply a protective epoxy primer over clean, rust-free metal before applying your filler.