
Car Clear Coat Repair: Stop the Peeling Feeling
Car Clear Coat Repair Starts With Removing Failed Coating
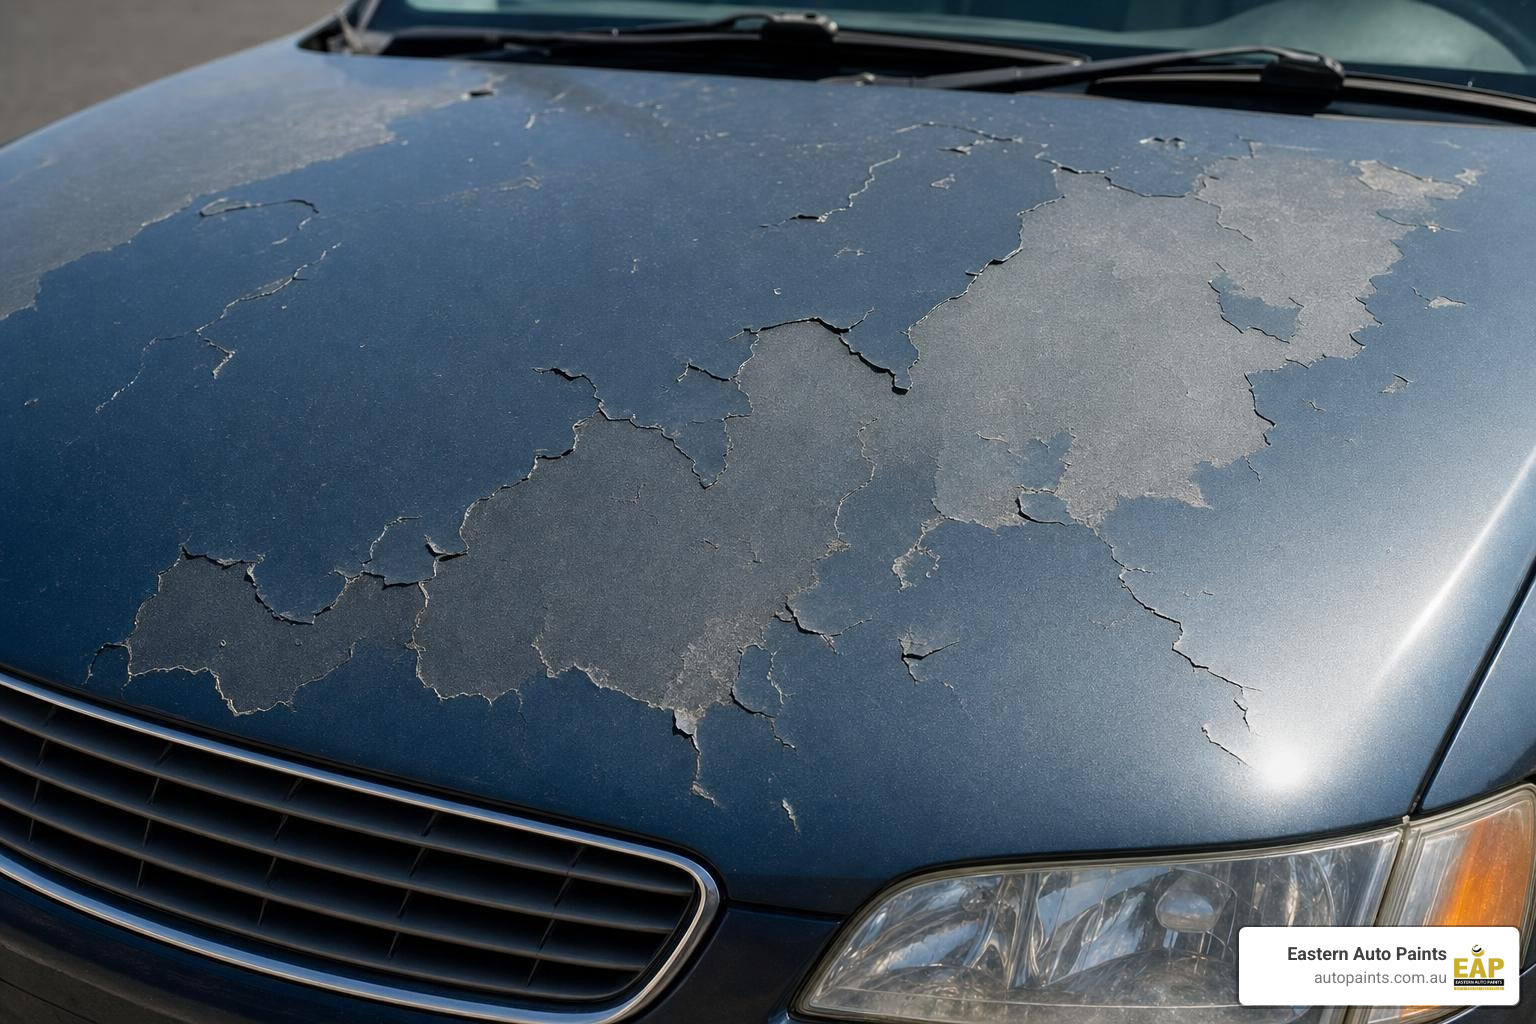
A sound clear coat can make an older vehicle look deep, glossy and well protected. Once it is lifting, chalky or flaking, however, wax and polish cannot restore the failed layer. Car clear coat repair begins by removing loose material, feathering the remaining edge, cleaning the panel thoroughly, then applying compatible colour and clear coat where needed. Small, stable sections can be repaired locally, but widespread peeling usually needs a full panel refinish for a durable, even result.
Key Takeaways
- Do not spray new clear over loose or peeling clear coat.
- Confirm whether the colour coat beneath is still sound before deciding on a spot repair.
- Feather the damaged edge smoothly, then remove wax, grease and sanding residue.
- Choose a compatible clear coat system and follow its technical process for mixing, application and curing.
- See The Ultimate Guide to Automotive Clearcoats for more detail on selecting the right finish.
At Eastern Auto Paints, we help trade applicators and serious DIY restorers approach paint repairs methodically. We focus on the practical details that determine whether a repair blends in properly or develops visible edges, poor adhesion or premature failure.
Our value is straightforward: reliable coating systems, informed product guidance and respect for proper preparation. With the right surface assessment and refinishing process, you can protect the underlying colour coat and achieve a finish that is built to last.
Why Peeling Clear Coat and Paint Delamination Cannot Be Ignored
The clear coat layer functions as the primary barrier protecting your vehicle from harsh ultraviolet (UV) radiation, chemical fallout, bird droppings and moisture. Once this top layer suffers from resin delamination and begins to peel, the fragile basecoat underneath is directly exposed to the elements. Unprotected basecoat oxidises rapidly, leading to pigment breakdown, colour fading and eventual moisture penetration through to the bare metal substrate, creating an environment primed for corrosion.
Car clear coat repair becomes necessary the moment the protective envelope fails. Leaving delaminated clear coat untreated allows wind, rain and standard washing routines to force additional moisture beneath the failing edge, accelerating the spread across the entire panel. Understanding the chemical structure and protective nature of these topcoats is key, as discussed in The Ultimate Guide to Automotive Clearcoats.
Step 1: Performing the Adhesion Tape Test for Clear Coat Failure
Before commencing any sanding or refinishing work, you must identify the boundary where the clear coat is still firmly bonded to the underlying basecoat. The adhesion tape test provides a straightforward method to determine whether a localised repair is realistic or if the entire panel must be stripped back:
- Clean the affected panel thoroughly using a dedicated wax and grease remover to eliminate road oils and surface dirt.
- Apply a strip of high-tack automotive masking tape directly across the margin where the peeling clear coat meets the intact clear coat.
- Press the tape down firmly with your thumb to ensure maximum surface contact.
- Pull the tape back rapidly at a sharp 90-degree angle.
- Inspect the adhesive backing. If the clear coat continues to flake away with the tape, the delamination is active and ongoing.
If the clear coat lifts beyond the initial defect, attempting a localised spot repair will generally result in edge lifting later. In such circumstances, the remaining delaminated clear coat across the panel must be completely removed down to a stable substrate.
Identifying Substrate Damage Before Car Clear Coat Repair
Once the loose clear coat is mapped, carefully inspect the condition of the exposed basecoat. If the vehicle has been driven for months with exposed basecoat, the pigment has likely suffered significant chalking and UV degradation. Applying clear coat directly over oxidised, weathered basecoat will result in poor intercoat adhesion, cloudy visual patches and rapid delamination.
For guidance on evaluating your vehicle's existing paintwork, review our breakdown on 5 Practical Ways to Identify Types of Clearcoat. If the basecoat is intact, unbroken and uniform in colour, a clear-only repair can be carried out. However, if the basecoat is thin, scratched, discoloured or sanded through, re-applying matching colour before clear coating is mandatory.
Essential Equipment and Materials for Car Clear Coat Repair
Refinishing clear coat successfully requires appropriate abrasives, cleaning agents, application equipment and safety gear.

Key materials required for the repair process include:
- Dedicated automotive wax and grease remover
- Sunmight wet and dry sanding sheets in various fine grits
- Rigid and flexible Velocity sanding blocks to maintain flat profiles
- High-grade automotive masking paper and solvent-resistant tape
- Lint-free tack cloths for final dust decontamination
- Two-pack (2K) or single-pack (1K) clear coat products, such as convenient 2K clear aerosols
When handling automotive refinish materials, always consult the manufacturer's technical data sheet (TDS), product label and relevant SafeWork or WorkSafe guidance for product-specific personal protective equipment (PPE) requirements, including appropriate organic vapour respirators, gloves and eye protection.
| Feature | 1K Acrylic Lacquer Clear | 2K Isocyanate Urethane Clear |
|---|---|---|
| Curing Mechanism | Solvent evaporation | Chemical crosslinking via hardener |
| UV Resistance | Standard | High long-term UV stability |
| Chemical Resistance | Moderate | High resistance to fuels and solvents |
| Film Hardness | Flexible, softer finish | High mechanical scratch resistance |
| Equipment Needed | Standard aerosol or spray gun | 2K aerosol (with integrated button) or spray gun |
Selecting 1K Lacquer vs 2K Urethane Systems
Choosing between a single-pack (1K) system and a two-pack (2K) system depends on the scope of the project, original vehicle coating and intended durability.
Dulon 1K Premium Clearcoat
When you would use this: Dulon 1K Premium Clearcoat is suited for classic acrylic lacquer repairs, smaller cosmetic touch-ups and projects where rapid air drying without the use of chemical hardeners is preferred. It allows for straightforward blending and effortless post-cure polishing.
Concept MS 22 2K Acrylic Urethane Clear Coat
When you would use this: Concept MS 22 2K Acrylic Urethane Clear Coat is suited for modern automotive refinishing where maximum gloss retention, superior chemical resistance and high mechanical durability are required. Its two-component formulation relies on isocyanate crosslinking to recreate a factory-grade barrier.
Decision Guide
- Select a 1K acrylic clearcoat when repairing older acrylic paint systems, non-structural cosmetic parts or when working in environments where two-component mixing is not feasible.
- Select a 2K urethane clearcoat when matching modern OEM finishes, working on exterior panels exposed to continuous weather, or requiring maximum resistance against petrol, detergents and UV radiation.
Step-by-Step Application Process for Spot and Panel Repairs
Achieving an invisible repair requires methodical surface preparation and controlled application technique, as outlined in How to Never Worry About Applying Automotive Clear Coat Again.
Surface Preparation and Feather-Edging the Peeling Margin
Proper surface preparation prevents edge mapping, where the boundary of the old clear coat remains visible under the fresh coating.
- Clean the entire repair area with wax and grease remover, wiping dry with clean microfibre towels.
- Mount fine abrasive paper onto a sanding block or prepare sanding discs.
- Sand the edge of the peeling clear coat outward toward the intact finish, feathering the step down until your fingertip can no longer feel the transition line.
- Progressively refine the sanding scratch marks using finer grades of wet and dry abrasives across the surrounding blend zone.
- De-nib and thoroughly degrease the panel again, ensuring all sanding sludge and dust are completely removed before masking.
Basecoat Touch-Up and Blending Techniques
If basecoat damage has occurred during delamination or sanding:
- Mask adjacent trim and surrounding panels to protect against overspray.
- Apply precisely matched colour using custom basecoat mixed colours.
- Apply light, even coats over the prepared area to achieve uniform opacity, tapering each pass outward to blend seamlessly with the original shade.
- Allow sufficient flash-off time between coats as specified on the basecoat product label or manufacturer's TDS before moving to clear coat application.
Executing the Spray Application for Car Clear Coat Repair
Proper atomisation, gun setup and pass overlap are essential when applying clear coat. For an in-depth reference on professional refinishing parameters, refer to our 2K Clear Coat Ultimate Guide.
When spraying larger sections, high-solids systems like Protec Paraglaze Ultrafinish Clearcoat provide excellent gloss and build. Always consult the product label or manufacturer TDS for product-specific mix ratios, gun distance, spray pressure and flash-off requirements before spraying. Maintain an even overlap pattern across the repair boundary, extending slightly past the basecoat blend into the prepared clear coat area.
Post-Cure Rectification, Compounding, and Long-Term Paint Care
Once the clear coat has fully cured according to the manufacturer's drying schedule, minor imperfections such as dust nibs, texture mismatch or dry spray edges can be rectified.
Rectification involves:
- Light wet-sanding of any surface dust nibs using ultra-fine micro-finishing abrasive paper on a soft backing pad.
- Compounding the sanded area using an automotive rotary or dual-action buffer paired with Farecla G360 Super Fast Compound to eliminate sanding marks and restore depth of gloss.
- Polishing with a fine foam finishing pad to remove compounding haze and swirl marks.
- Maintaining the finish by washing with pH-neutral car wash solutions and avoiding abrasive cleaners.
Avoiding Common Clear Coat Repair Mistakes
- Edge Mapping: Occurs when the transition between old and new clear coat is not feathered smoothly enough.
- Dry Spray: Results from holding the spray can or gun too far from the panel; always maintain recommended application distances as specified in the product TDS.
- Solvent Boil: Caused by trapping evaporating solvents under a subsequent coat applied too quickly. Always observe stated flash-off times.
- Premature Waxing: Applying heavy paste waxes before the clear coat has completed outgassing can trap residual solvents and cause hazing.
Why This Issue Should Not Be Ignored
Clear coat peeling is progressive. What begins as a small patch of clear coat delamination will steadily expand across the vehicle panel under the effects of temperature cycling, rainwater ingress and highway wind speeds. Ignoring clear coat breakdown leaves the sensitive basecoat vulnerable to permanent UV bleaching and moisture intrusion, ultimately exposing the metal underneath to rust and corrosion. Addressing the clear coat in its early stages preserves the underlying factory colour and prevents extensive bodywork down the track.
Common Symptoms, Challenges, or Questions
Vehicle owners frequently face specific symptoms and practical questions when evaluating clear coat condition:
- Cloudy or milky patches: Early warning signs that UV exposure is weakening the polymer bonds within the clear coat layer.
- Chalky surface residue: Indicates the clear coat has lost its UV absorbers and is actively degrading.
- Flaking edges around stone chips: Common points of entry where water has penetrated under the resin film.
- Matching texture: Achieving an even orange-peel texture that seamlessly matches untouched factory panels.
What a Personalised Experience Actually Looks Like
When tackling a clear coat repair, matching the exact product system to your vehicle's make, age and original paint chemistry makes all the difference. A tailored approach ensures you receive the correct abrasive grits, suitable cleaning solvents and compatible coating formulations, whether you require convenient aerosol packaging for a localised bumper corner or bulk refinish materials for complete bonnet and roof restoration.
The Value of Consistency and an Ongoing Relationship
Refinishing automotive surfaces is a precise trade where consistent material quality and dependable technical guidance yield repeatable results. Having direct access to premium coatings, dedicated refinish equipment and experienced technical advice ensures that every step, from surface preparation to final compounding, is supported by proven industry practices.
What to Expect at Eastern Auto Paints
At Eastern Auto Paints, we supply industry-grade refinishing products engineered to meet trade demands. When sourcing materials through us, you can expect:
- Advanced colour matching technology used alongside experienced professionals to ensure seamless basecoat transitions.
- A comprehensive Clearcoat Range encompassing both 1K acrylics and premium 2K urethanes.
- Professional surface prep supplies, including premium sanding discs, backing pads and dedicated cleaning degreasers.
- Knowledgeable support from professionals who understand the practical intricacies of automotive refinishing.
When to Get in Touch or Take Action
If your vehicle exhibits early signs of clear coat chalking, peeling or localised delamination, taking prompt action will save valuable time and prevent the need for full bare-metal repairs. For personalised advice on selecting the right clear coat system, abrasive progression or application tools for your project, get in touch for advice with our team or explore our complete selection of auto refinishing supplies.
For additional product information and technical guides, explore our full collection:
- Clearcoat Products and Kits
- Two-Pack Clear Coat Collection
- Basecoat Mixed Colours
- Automotive Abrasives and Sanding Sheets
- Automotive Spray Cans Range
Frequently Asked Questions About Car Clear Coat Repair
Can peeling clear coat be fixed without repainting the basecoat?
Peeling clear coat can be repaired without repainting the basecoat only if the clear coat has lifted recently and the underlying colour coat is completely undamaged, clean and unfaded. If the clear coat has been missing for an extended period, UV radiation will have oxidised the basecoat pigment, causing noticeable colour variation and poor intercoat adhesion. In cases where the basecoat is compromised or sanded through during feathering, applying fresh basecoat colour before clear coating is necessary for an even finish.
What is the difference between 1K and 2K clear coats for spot repairs?
Single-pack (1K) clear coats dry purely through the evaporation of solvent thinners, making them easy to apply and sand, though they offer moderate chemical and UV resistance. Two-pack (2K) clear coats utilise a chemical hardener containing isocyanates that crosslinks with the resin, forming an exceptionally durable, chemical-resistant and UV-stable film that matches modern factory finishes. For long-term vehicle repairs exposed to harsh weather, 2K systems provide superior protection and gloss retention.
How do I prevent the edge of the repair from showing through the new finish?
Preventing edge mapping requires careful feather-edging of the peeling clear coat using progressively finer abrasive papers on a dedicated sanding block. If a distinct step remains between the bare basecoat and intact clear coat, the solvent in the new clear coat will swell the exposed edge, creating a visible ring. Feathering the margin out smoothly and scuffing the surrounding blend area ensures the new clear coat sits flat across the repair.
How soon after clear coat repair can the vehicle be washed or waxed?
Fresh clear coat requires adequate time to cure and release all residual solvents before being sealed. While the vehicle can typically be washed gently using cool water and pH-neutral car wash soap once cured according to the product technical data sheet, applying heavy paste waxes, silicones or ceramic coatings should be delayed to allow full solvent outgassing. Always consult the specific coating's technical data sheet for exact post-application care timelines.
What causes automotive clear coat to start peeling originally?
Clear coat delamination is primarily triggered by prolonged exposure to solar UV radiation, which degrades the chemical bonds within the clear resin film. This degradation causes the coating to become brittle, lose elasticity and break its bond with the basecoat. The process is often accelerated by micro-scratches from improper washing, stone chip impacts, unwashed environmental fallout or factory-level adhesion issues during initial vehicle assembly.